Wednesday, January 30, 2013

Blessings Jar

Here's another jar we're keeping each week at
our Wednesday Women Group meetings.

Each week we write on a notecard something that
happened in the week since we last met that we
count as a blessing or to simply praise God for
his grace. 

At the end of the year or beginning of next year, we'll
take all of our cards out and read them to remember
all the wonderful things in our lives throughout 2013.

Tuesday, January 29, 2013

Christmas Jar

Okay, so I know it's January and Christmas was
just a little over a month ago, but
check out this Christmas Jar. 

 
We decided in our Wednesday Women
Group that we would all pitch in some change and bills each
week that we meet throughout the year and at Christmastime
this year bless one person or family with our jar full
of money.

 
You bless someone or family with the jar anonymously in
whatever way the Lord leads you and make someone's
Christmas a little brighter and their hearts warmer. 


The idea comes from the story told in the book "Christmas Jars" written by
Jason F. Wright.  The cover of the book is shown below and can
be found at many major booksellers.
 
Stock Image 

Friday, January 25, 2013

Paper Pumpkin


Introducing My Paper Pumpkin! It's a Magical Paper Escape Every Month!
 

Sweep away the mundane-your creativity carriage awaits!

I'm Paper Pumpkin . . .
I come to your door each month (a fully decked-out creativity carriage). I'll help you to escape your life with some paper fun.
I come in a sweet box, but you'll really love what you find on the inside:
All the stamps, ink, paper, and accessories to create pinable projects. Create stuff like cards, journals, décor, and more!
Paper Pumpkin by Stampin' Up! is a new monthly kit program that anyone (even you) can enjoy!

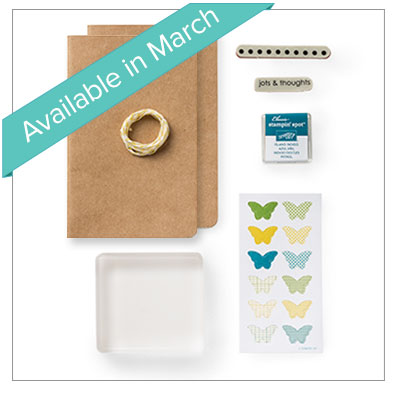
Here's what you'll find when you open your Try-It Kit box:

Afraid of commitment? Too much pun'kin for you to handle? You can try me and I'll visit just once
(But I know you'll want me to come back every month.)
 
  • • I'm $16.95 (plus shipping).


  • • I've got all the stamps, ink, paper, and accessories to create beautiful projects.


  • • I'm all cut, measured, and ready—with instructions included. (Don't worry, I'm easy.)

  • Here's the finshed journal:
     
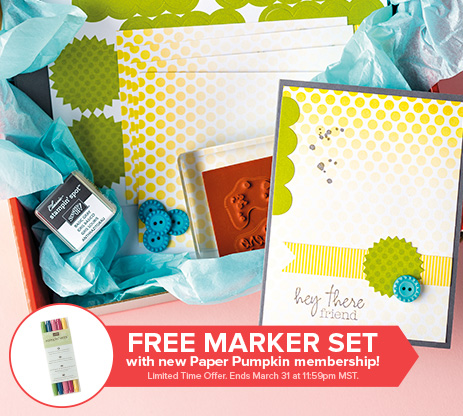
    If you decide you like the Try-It Kit and want to join, here's another example of what will come to your door:


    And the finished project:
     

    What an incredible way to be creative on a budget and take the guesswork out of color matching and designing when your brain is stumped!  These kits have everything you need to create beautiful handmade professional-looking projects.  And best of all, they get delivered straight to your door each month!  What are you waiting for?  Sign up today!!!


    Thursday, January 24, 2013

    Stamp Pad Color Block Card


    Here's a fun technique Shelli demonstrated this year
    at Stampin' Up!'s Leadership convention.
     
    You take one of Stampin' Up!'s ink pads (these cards show the old felt pad style),
    turn it upside down and place directly onto the front of your card. 
    Press on the upside down ink pad, concentrating more on the corners and
    the edges than the center.  When you lift the ink pad, you'll have a
    little white space to stamp your image and sentiment. 
     
    The splatters were done using the Color Spritzer Tool
    (found on page 179 of the 2012-2013 Annual Catalog) 
    with a Basic Black marker.
     
     
    This is Lucky Limeade color.
     
    This is Wisteria Wonder color.
     
    The Stamp Set is Oh, Hello #130733 from the Spring Catalog.
     
    What a fun and simple card!  You could make several in no time
    at all and have them on hand for when the time comes that you need one.


    Wednesday, January 23, 2013

    Valentine's Day Heart-Shaped Box

    Happy Wednesday!  What a beautiful day we're having here
    in North Texas.  70 degrees and sunny!  What a nice change from the cold!
     
    I want to share with you today one of our projects from last
    night's Stamp Club meeting.  Hard to believe Valentine's Day is
    just a few weeks away!
     
    I got the directions for making this box here.  She gives
    EXCELLENT step-by-step instructions, way better than I
    could do, so be sure and check out her site.
     
    I, of course, changed the design to fit my taste, and here's what I came up with:
     
    These are the same box, just with different ribbon at the top.  One uses Pool Party
    Seam Binding Ribbon and one uses Pool Party 3/8" Ruffled Ribbon.

    The sides are embossed with the Hearts embossing folder from the Adorning Accents
    Folders set on page 188 of Stampin' Up!'s 2012-2013 Annual Catalog.

    When you untie the ribbon, the flaps open up so you gain access to the goods!

    Close-up of the details.  This is one of the Designer Builder brads from the
    Spring Catalog.  Love them!
     
    Stamp sets used:  Itty Bitty Bits #120060, That's the Ticket #128075, Hearts a Flutter Bundle with the Framelits #131097
    Paper used:  Real Red, Very Vanilla, More Amore Specialty Designer Series Paper #129309

    Monday, January 21, 2013

    All Dressed Up Birthday Card

    Hello, crafty ladies!  I know I haven't posted in a week. 
    No, I haven't been hiding under a rock!
     
    Here is a little card we made last night at our
    downline meeting as a make & take.
     
    When I first saw the All Dressed Up stamp set
    and Framelits in the Spring Catalog, I didn't think
    they were all that neat ... until I went to Leadership and
    saw them being demonstrated.
     
     
    Now I'm in LOVE!!!  These are so cute and versatile!
     
    The patterned paper is the Tea For Two Designer Series Paper,
    found in the Spring catalog also, and a flower cut from the
    5/8" Flower Trim for the belt on the dress.
     
    How many ways can you think of to use these little dies?


    Friday, January 11, 2013

    Leadership Swap #2 - Chalkboard Card


     Keeping this one simple ... this is my attempt at the chalkboard look.
    I used Basic Black cardstock, used some white Staz-On ink
    and sponged a few "eraser" marks, then stamped the sentiments in
    Versamark ink and embossed with a 50/50 mixture of
    white embossing powder and clear embossing powder. 
    I wanted the white to get diluted a little bit and not be so white,
    so I mixed with the clear embossing powder. 


    After you're all embossed and beautiful, then just take the white gel pen
    and make a border and some doodles around the heart.  I used the Polka Dot Parade
    Designer Series Paper and Pool Party paper for the flags and cut the hearts with the
    Hearts Framelits and Big Shot.
     
    The base cardstock is the Naturals White cardstock.

    Thursday, January 10, 2013

    Leadership Swap #1

    Here's one of my swaps for Leadership...
    It has the Bloomin' Marvelous stamp from the Sale-A-Bration catalog,
    the Sycamore Street Designer Series paper from Sale-A-Bration,
    and the Madison Avenue stamp set for the inside of the
    flower and the flower stem.  Don't you love those names??
     
    I used the new paper-piercing pack from the Spring catalog to
    pierce holes around the flower, which was punched using the Blossom punch
    from the annual catalog.  (The same punch I used for the snowflake
    stamp in a previous post.)


    Below is a closeup of the flower.  I stamped it in Pool Party ink with the Mixed Bunch stamp set.
    The inside of the flower is Rich Razzleberry and so is the cardstock.  The stem is stamped with Summer Starfruit ink, which at first I thought I didn't really care for, but is now one of my faves!!
    And, of course, what flower isn't complete without some bling?  This again is the mondo rhinestones found in the Spring catalog.


    Wednesday, January 9, 2013

    DVD Case Notepad

    Check out this gift I received from Sharon Armstrong, one of my uplines.
    It's a DVD case that holds a notepad! She used My Digital Studio
    to create an insert that has my name and the Leadership 2013
    title and some other fun sayings.


    When you open it up, there's a pocket on the left side for receipts
    and a notepad on the right for me to take some notes
    at the Leadership convention. 
    And best of all, Sharon wrote her own little special note to me!  :)


    Is this not the cutest thing?  I love it!  Thanks, Sharon!!!

    Tuesday, January 8, 2013

    Snowflake Gift Tag

    I just loved the single stamps that Stampin' Up! offered over the holidays!
    This little snowflake stamp actually coordinates with a flower punch! 
    It's the Blossom Punch in the annual catalog.  Isn't that clever?
     
    This is a little gift tag we made at our last Stamp Club.  I like
    doing the tone-on-tone look.
     
     
    It's also got the mondo rhinestones found in the new Spring catalog. 
    Those things are fun!
     
    I'm off to pack and get ready for Leadership in Orlando! 
    I leave early Wednesday morning. Woo hoo! 
    I'm so excited, I can't hardly stand it.  I'll be sure and post pics!


    Monday, January 7, 2013

    Explosion Box Christmas Gift

    Happy New Year!!  I know, I'm 7 days into the year, but today is the day
    I start my resolution to blog more.  I am making a committment to put crafting
    and blogging on my calendar in pen so I always make time for what's important! 
    I mean, a girl's gotta have priorities!
     
     
    Here are a few pictures of the explosion box gift I made for my stepson
    as his Christmas gift.  He's 16, has a car, a job, and just recently found out,
    a new girlfriend!  Scary times. {Sigh}
     
    But I digress.  This is just a one-layer box to house gift cards and cash
    in each pocket on each side.
     
    Here's a picture of the closed box.  It's got a "to-from" tag on top that opens.
     
     
    And then when you take the lid off ...  BAM!!! 
     
     
    Here are the four individual sides: 


    I like that I positioned Mr. Franklin as if he was glaring at you,
    like he's saying, "don't spend me all in one place."  Hahaha!


    Thursday, January 3, 2013

    The Spring Catalog is LIVE!!! 2 Valentine's deals!

    Today is the day the Spring Catalog goes live!  Do you have your wish list ready? 
    There are soooo many cute things in this catalog!


    PLUS . . . TWO NEW STAMPIN' UP! VALENTINE PROMOTIONS!
    From January 3 through January 21, Stampin' Up! is offering two valentine deals!
     
    DEAL #1: MY LITTLE VALENTINE STAMP SET EXCLUSIVE. Get the Sealed with Love Simply Sent Kit FREE ($7.95 value, pictured below) when you purchase the brand-new My Little Valentine Set ($9.95). This four-piece set was created exclusively for this promotion and will not be available again after January 21! No limit!Stampinup stampin pretty simply sent kit
    The My Little Valentine Stamp Set is only available in clear-mount. Stamp images shown below:
    132242L
    ItemDescriptionPrice
    132242My Little Valentine (English; clear-mount) $9.95
    132245Enamorados (Spanish; clear-mount)$9.95
    132248Mon petit amour (French; clear-mount)$9.95

    DEAL #2 VALENTINE TREAT BUNDLE. This special bundle offer contains the brand-new Happy Valentine Heart Single Stamp (coordinates with the Stampin' Up! Full Heart Punch, #119883 which is NOT included in the bundle) and a package of 1" x 8" cellophane bags. No limit on the number of bundles you can order! The Happy Valentine Heart Single Stamp and bundle deal are ONLY available through Jan. 21. To get the bundle pricing, use item #132771.
    132771L
    Bundle ItemDescriptionRetail ValueSpecial Bundle Price
    132771Valentine Treat Bundle
    Includes the Happy Valentine Heart Single Stamp (clear-mount) and 1" x 8" cellophane bags
    $7.45$5.95


    Get yours today and start crafting something from the heart for your special Valentine!